Friday 22 March 2013

JavaFx: Structuring your Application - Service and Application State layer

This post is part of a series of blog posts about structuring your JavaFx application. Here's an overview:
  1. Overview
  2. View layer
  3. Application logic layer
  4. Service - Application State layer(this post)
In this post I'll explain which classes should be used to communicate with external sources and how we store application state.

Service

A Service is used to communicate with an external resource. This can be anything, from a webserver to a printer.
Every Service should focus on a certain resource or a subset of it (like a Service which only performs contact related REST calls).
Again, it's also important to put your Service behind an interface. By doing this you can mock it when unit testing commands, but it also allows you to create a stub implementation which you can use while the back-end developers are creating the server code and swap it with the real implementation once they have finished the backend code.

Such a service can look like this:
public interface IEventService {

    List<EventVO> getEvents();
    EventVO getEventDetails(String id);
    void acceptEvent(EventVO event);
    void declineEvent(EventVO event, String reason);
}
And the stub implementation:
public class StubEventService implements IEventService {

    private List<EventVO> events;

    public StubEventService() {
        Calendar calendarDate = GregorianCalendar.getInstance();
        calendarDate.set(2012, 4, 24, 10, 20);
        Date date = calendarDate.getTime();

        
        events = new ArrayList<EventVO>();
        events.add(createEvent("1", "First Event", "Paris, France", date, date,
                "The event will showcase the first application"));
        events.add(createEvent("2", "Special meeting", "Manchester, UK", date, date,
                "A special meeting for a special application"));
        events.add(createEvent("3", "Technology meetup", "Brussels, Belgium", date, date,
                "Geeking out with the latest technologies"));
        events.add(createEvent("4", "Designer Conference", "Boston, US", date, date,
                "Various talks by the most famous designers in the industry"));
    }

    @Override
    public List<EventVO> getEvents() {
        return events;
    }

    @Override
    public EventVO getEventDetails(String id) {
        for (EventVO event : events) {
            if(event.getId() == id) {
                return event;
            }
        }

        return null;
    }

    @Override
    public void acceptEvent(EventVO event) {
    }

    @Override
    public void declineEvent(EventVO event, String reason) {
    }

    private EventVO createEvent(String id, String name, String location, Date startTime, Date endTime, String description) {
        EventVO event = new EventVO();
        event.setId(id);
        event.setName(name);
        event.setLocation(location);
        event.setStartTime(startTime);
        event.setEndTime(endTime);
        event.setDescription(description);
        return event;
    }
}

The Model

A model is used to store and share state across your application. This allows you to react to certain state changes in multiple parts of your application.
A model is in most cases just a class with some properties that define the state (e.g. the selected contact, the list of contacts that is shown). In some cases it can contain some basic logic, but this should never be complicated (if it is, then move it to a command).
In most cases it will be a command that updates the model or takes values from it to return it to the view layer.
As always, you should put the Model behind an interface for unit testing purposes.

This is how such a model can look like:
public interface IEventSelectionModel {
    EventVO getSelectedEvent();

    void setSelectedEvent(EventVO event);

    ObjectProperty<EventVO> getSelectedEventProperty();
}

And the implementation:
public class EventSelectionModel implements IEventSelectionModel {

    private ObjectProperty<EventVO> selectedEvent = new SimpleObjectProperty<EventVO>(this, "selectedEvent");

    @Override
    public EventVO getSelectedEvent() {
        return selectedEvent.get();
    }

    @Override
    public void setSelectedEvent(EventVO event) {
        selectedEvent.set(event);
    }

    @Override
    public ObjectProperty<EventVO> getSelectedEventProperty() {
        return selectedEvent;
    }
}

Conclusion

This was the final article in the series.
My goal was to share my view on a fat client architecture and hopefully get the conversation started about client architectures with JavaFx. That way we can improve this architecture or even find (better) alternatives.

Monday 18 March 2013

JavaFx: Structuring your Application - Application Logic Layer

This post is part of a series of blog posts about structuring your JavaFx application. Here's an overview:
  1. Overview
  2. View layer
  3. Application logic layer(this post)
  4. Service - Application State layer
Because this architecture is targeting fat clients which have all the business logic on the client side it is important to structure this in an organized and efficient way. In this post I'll explain how you can organize your application logic in a way that it won't block the UI.

The Command

A command is a stateless object which is executed once and then disposed of. It has a single responsibility, which clearly defines its purpose.
Such a command can for example have the responsibility to create a new contact, calculate the total amount of money a client has to pay etc.
This leads to a higher number of classes, but it has some advantages over a controller:
  • A command will have less dependencies because of its single responsibility. This makes it easier to test.
  • When using good class/package name conventions it's easier to find a certain piece of logic.
A command can use Services and Models to do its job, but should never reference the mediator.

Running it in the background

Because business logic should run in a background thread to avoid blocking the UI, I'm using a convention to make every command extend from the JavaFx Service class.
The Service class is used in JavaFx to run some code in one or more background threads. More info on this class can be found here: http://docs.oracle.com/javafx/2/api/javafx/concurrent/Service.html
This fits perfectly in my design because it makes sure that all business logic is executed in a background thread. Because it's an integral part of our application structure developers won't forget to start a new thread because it will be done transparently when creating a new instance of a command and starting it.

How it looks like in code

This is how it looks like in code. The command has one parameter which should be set before starting the command and it has a dependency to the IEventService. When it's finished it return an EventVO instance with all the details of the event.
public class LoadEventDetailsCommand extends Service<EventVO> {

    @Inject
    public IEventService eventService;
    public String eventId;

    @Override
    protected Task<EventVO> createTask() {
        return new Task<EventVO>() {
            @Override
            protected EventVO call() throws Exception {
                return eventService.getEventDetails(eventId);
            }
        };
    }
}

And this is how you can use it in the mediator. The commandProvider is something which I'll discuss in a moment, but it basically creates a new instance of a certain command class. When you call the start() method the command will start its execution in a background thread.
LoadEventDetailsCommand command = commandProvider.get(LoadEventDetailsCommand.class);
command.setOnSucceeded(new LoadEventDetailsSucceededHandler());
command.eventId = eventSelectionModel.getSelectedEvent().getId();
command.start();

And finally the succeeded handler which is just an inner class in my mediator. It gets the EventVO result from the command and asks the view to show the new details:
private class LoadEventDetailsSucceededHandler implements EventHandler<WorkerStateEvent> {
    @Override
    public void handle(WorkerStateEvent workerStateEvent) {
        view.updateEventDetails((EventVO) workerStateEvent.getSource().getValue());
    }
}

The CommandProvider

The CommandProvider is a class which I've created as sort of a Command factory, which uses a Guice injector to produce the instances. This allows us to inject dependencies in the commands.

The interface:
public interface ICommandProvider {

    <T extends Service> T get(Class<T> type);
}

And the implementation:
public class CommandProvider implements ICommandProvider {

    @Inject
    public Injector injector;

    public <T extends Service> T get(Class<T> type) {
        return injector.getInstance(type);
    }
}

Conclusion

In this article we've seen how you can organize the business logic in a single layer and how you can make sure that it won't block the UI. In my next and final article I'll explore the Service and Model classes which allow us to communicate with external sources and store application state.

Monday 11 March 2013

JavaFx: Structuring your Application - View Layer

This post is part of a series of blog posts about structuring your JavaFx application. Here's an overview:
  1. Overview
  2. View layer (this post)
  3. Application logic layer
  4. Service - Application State layer
In this post I'll explain the components of the view layer (View and Mediator), how they should interact and some best practices on how to use them.

The View

This class is where you'll use the JavaFx components to build your UI. It's also responsible for displaying notifications, opening new windows or just about anything that it related to the UI (and which should happen on the UI thread).
I prefer to create my UI with pure Java code instead of using FXML. It's fast, easier to use with Guice and it's giving me more control over my code. Therefore my structure is based on this.
To keep the Views focused on their tasks, you should follow these rules.

Rule 1: Don't let your View extend JavaFx components

The View should never extend a JavaFx component, it should only use JavaFx components. This rule is also known as "composition over inheritance".
Our View classes will have a getView() method which will create and return the top-level component/container of that view. That way the actual view is only instantiated when the getView() method is called. This has several benefits:
  1. Remember from the previous post, the View classes are mapped in Guice and injected in the View classes where they will be used. By not extending a JavaFx component, the cost of creation will be lower when Guice creates and injects these Views.
  2. You can extend any other class you want because the design doesn't force you to extend JavaFx components.
  3. The API of your view will not be cluttered with all the methods of the JavaFx component

Rule 2: The View should never contain application logic

The view can contain view logic (like when to play an animation), but should never contain application logic.
Application logic can sometimes take up several 100ms. If you do this on the UI thread, then during this time the UI will not be able to update anything, so it will feel unresponsive. Therefore it's very important to run your application logic on a separate thread (which in this structure will be in a Command).
If some application logic should be executed in response to a button click, it should call the mediator to delegate this to the application logic layer.

Rule 3: Put your view behind an interface

You should create an interface for your View class. This interface should contain the methods that can be called by the Mediator.
Creating such an interface has several advantages:
  1. You create an API for your View which clearly indicates what it can do.
  2. The mediator can work against this API, so it isn't tied to a certain View implementation. This is especially handy when writing unit tests for your mediator because you can create a mock for the view and inject that into the mediator.

How it looks like in code

Now how does this look like in code when you apply the rules above? I'll show you some code of a view which shows a list of events. The user can select one of the events by clicking on them.

First we have the View interface:
public interface IEventListView {

    /**
     * Asks the view to update the list of events with this new list.
     */
    void updateEventList(List<EventVO> events);
}
And then we have the View implementation:
public class EventListView implements IEventListView {

    @Inject
    public IEventListMediator mediator;

    private ListView listView;
    private ObservableList events;

    public ListView getView() {
        if(listView == null) {
            events = FXCollections.observableArrayList();

            listView =  ListViewBuilder.create()
                    .items(events)
                    .onMouseClicked(new EventListMouseClickedHandler())
                    .build();
            listView.setCellFactory(new EventListItemRenderer());

            //when the view is created, ask the mediator to load the events.
            mediator.loadEvents();
        }

        return listView;
    }

    @Override
    public void updateEventList(List<EventVO> events) {
        this.events.clear();
        this.events.addAll(events);
    }

    private class EventListMouseClickedHandler implements EventHandler<MouseEvent> {

        @Override
        public void handle(MouseEvent mouseEvent) {
            mediator.updateSelectedEvent((EventVO)listView.getSelectionModel().getSelectedItem());
        }
    }
}
This view can then be used in the overview View like this:
public class EventOverviewView implements IEventOverviewView {

    ...

    @Inject
    public EventListView eventListView;

    public Pane getView() {
        if(view == null) {
            view = PaneBuilder.create()
                    .children(
                            eventList = eventListView.getView()
                    )
                    .build();
                     
                    ...
        }

        return view;
    }
 
    ...
}


The Mediator

The Mediator is the postman between the view and the application logic. It is receiving messages (calls) from the View and it passes them on to Commands. It also passes on messages that are coming from the application logic to the view. Again, some rules apply here.

Rule 1: The mediator should not contain any application logic

The mediator runs on the UI thread, so it should not contain any application logic as this can make your application unresponsive. It should instead create a command (by using the CommandProvider class) and start the command which will then execute the application logic.
By following this rule we avoid duplicate code and make sure that application logic can always be found in one layer instead of being scattered in multiple layers, which in the end makes your application more maintainable.

Rule 2: The mediator should have an interface

The Mediator should have an interface which defines which actions it can perform. These methods can then be called in the view.

Rule 3: Don't do complex manipulations on your Models in your mediator

In some cases it can be handy to inject a Model into the mediator to directly access the application state without having to write a command for it. But to avoid excessive use of this, you should only listen to changes on the model, get simple data from it or set simple things on it. If the data needs to be manipulated in any way, don't access the model directly but create a command instead which will contain this logic. So be very careful when accessing the Model from your Mediator.

How it looks like in code

When you apply these rules it will look like this.

First we have the mediator:
public interface IEventListMediator {

    void loadEvents();

    void updateSelectedEvent(EventVO event);
}
And then we have the Mediator implementation:
public class EventListMediator implements IEventListMediator {

    @Inject
    public ICommandProvider commandProvider;
    @Inject
    public IEventSelectionModel eventSelectionModel;
    @Inject
    public IEventListView view;

    public void loadEvents() {
        LoadEventsCommand command = commandProvider.get(LoadEventsCommand.class);
        command.setOnSucceeded(new LoadEventsSucceedHandler());
        command.start();
    }

    @Override
    public void updateSelectedEvent(EventVO event) {
        eventSelectionModel.setSelectedEvent(event);
    }

    private class LoadEventsSucceedHandler implements EventHandler<WorkerStateEvent> {

        @Override
        public void handle(WorkerStateEvent workerStateEvent) {
            view.updateEventList((List<EventVO>)workerStateEvent.getSource().getValue());
        }
    }
}

Conclusion

In this post we've covered the View layer and the rules that should be followed. It also showed how the View and the Mediator communicate with each other. In the next post I'll cover the application logic layer were we'll see how heavy application logic will be offloaded to a separate thread in a consistent way.

Thursday 7 March 2013

JavaFx: Structuring your Application - Overview

Introduction

JavaFx is a new rich client framework by Oracle. It allows you to create visually pleasing enterprise business applications with the Java language.

While many small demos are showing up in the community, there aren't many articles on how to structure your JavaFx application. Using a good structure makes it easier to maintain your application, add new features and improves overall stability. These are all very important in enterprise applications.
This serie of articles will try to remedy that by showing you one of many ways to structure your application. This is certainly not the only way to do it, but it will give you a starting point. Even this structure is open for improvement (as every structure is).

This serie will consist of four blog posts:
  1. Overview (this blog post)
  2. View layer
  3. Application logic layer
  4. Service - Application State layer

High-level Overview

The structure I will describe is based on Robotlegs, an Apache Flex micro-architecture library. But instead of using events to decouple the layers, I went with for direct calls (with interfaces in-between). While events allow you to decouple the layers even more, I prefer direct calls with interfaces over events because they make it easier to follow the flow of your application.

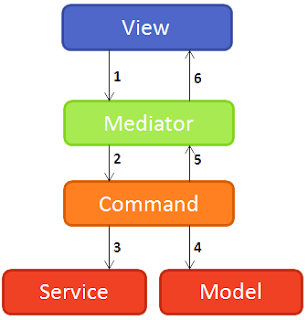
The diagram below shows the different components and layers in my architecture. The arrows indicate the dependencies.


  • View: This is where the JavaFx components are used to build the UI.
  • Mediator: The mediator facilitates the communication between the view and the application logic layer. This is why it's both included in the view layer as the application logic layer. This layer should not contain application logic, it's just a postman who receives calls from the view and delegates them to the application logic layer and vise versa.
  • Command: This is where your application logic will reside. A Command is a class which executes a single unit of work and will be disposed when it's finished.
  • Service: A service is used to access external resources. This can be a remote service, a file on the filesystem or a device attached to the user's pc.
  • Model: A model stores the state of your application. This can be the selected record which should be accessible in multiple views.

  • The diagram below shows a sample flow of an application. In this case the user clicked on a button to delete a contact in a list.


    1. The view asks the mediator to delete the item by calling the deleteContact(contact) method on the IContactListMediator interface.
    2. The mediator creates a new DeleteContactCommand and registers a success handler on it. Then it calls the start() method on the command.
    3. The command calls the contact service to delete the contact from the database
    4. The command calls a method on the model to remove the contact from the application state. It receives the updated list of contacts from the model
    5. The command finishes and triggers the registered success listeners. It provides the updated list of contacts to the success handlers.
    6. The success handler in the mediator asks the view to update the list of contacts based on the updated contact list it got from the command.

    Used libraries

    For my application I didn't use any framework (except for JavaFx, obviously), I wanted to create my own structure without the overhead of a framework. All I used was the JavaFx framework and Guice for dependency injection.
    For those interested in build tools, I used the JavaFx Gradle plugin created by Danno Ferrin to create a build script.

    Dependency Injection

    Mapping your dependencies

    A DI library like Guice allows you to inject instances of certain classes into other classes without you having to manually instantiate and inject them. This can greatly improve the quality of your code since you don't have to write all that yourself. Guice is basically the glue that holds your application together.

    In Guice you have to create a Module class which defines all the mappings. Such a module class can look like this for a simple application:
    public class EventManagerModule extends AbstractModule {
    
        @Override
        protected void configure() {
            bind(EventManagerModule.class).toInstance(this);
    
            mapViews();
            mapMediators();
            mapCommands();
            mapServices();
            mapModels();
            mapInfrastructure();
        }
    
        private void mapViews() {
            bind(IEventOverviewView.class).to(EventOverviewView.class);
            bind(IEventListView.class).to(EventListView.class);
            bind(IEventDetailView.class).to(EventDetailView.class);
        }
    
        private void mapMediators() {
            bind(IEventOverviewMediator.class).to(EventOverviewMediator.class);
            bind(IEventListMediator.class).to(EventListMediator.class);
            bind(IEventDetailMediator.class).to(EventDetailMediator.class);
        }
    
        private void mapCommands() {
            bind(ICommandProvider.class).to(CommandProvider);
    
            bind(LoadEventsCommand.class);
            bind(AcceptEventCommand.class);
            bind(DeclineEventCommand.class);
        }
    
        private void mapServices() {
            bind(IEventService.class).to(StubEventService.class);
        }
    
        private void mapModels() {
            bind(IEventSelectionModel.class).to(EventSelectionModel.class).in(Singleton.class);
        }
    
        private void mapInfrastructure() {
            bind(ITranslationProvider.class).to(ResourceBundleTranslationProvider.class).in(Singleton.class);
        }
    }
    
    So in most cases you will be mapping implementations to interfaces. Always try to use interfaces. This allows you to, for example, create a stub implementation of a service (in this case StubEventService) and a real implementation which you can then just swap by changing the Guice mapping.
    Only for the Commands I didn't create interfaces because they wouldn't add that much value. They would all practically be marker services, but you'll see that in my following posts.

    While this Module implementation is ok for a small application, it can quickly explode in one huge class when you're building a bigger application. This is where bootstrap classes come in handy. A bootstrap class is just a class which initializes a certain part of your application. In this case it would initialize the mappings of the views, the mediators or the commands. Such a bootstrap class would look like this:
    public class MediatorMapper implements Mapper {
    
        private AbstractModule module;
    
        public MediatorMapper(AbstractModule module) {
            this.module = module;
        }
    
        public void bootstrap() {
            module.bind(IEventOverviewMediator.class).to(EventOverviewMediator.class);
            module.bind(IEventListMediator.class).to(EventListMediator.class);
            module.bind(IEventDetailMediator.class).to(EventDetailMediator.class);
        }
    }
    
    Your module would then look like this:
    public class EventManagerModule extends AbstractModule {
    
        @Override
        protected void configure() {
            bind(EventManagerModule.class).toInstance(this)
    
            new ViewMapper(this).bootstrap();
            new MediatorMapper(this).bootstrap();
            new CommandMapper(this).bootstrap();
            new ServiceMapper(this).bootstrap();
            new ModelMapper(this).bootstrap();
            new ModelMapper(this).bootstrap();
        }
    }
    

    Wiring it all together

    Now how do you wire all this together? Well, that is what I'm going to show you now.

    In your Main class you will create a Guice Injector and with this injector you will instantiate the main view of your application. Your Main class will look like this:
    public class Main extends Application {
    
        public static void main(String[] args) {
            Application.launch();
        }
    
        @Override
        public void start(Stage stage) throws Exception {
            Injector injector = Guice.createInjector(new EventManagerModule());
            EventOverviewView eventOverviewView = injector.getInstance(EventOverviewView.class);
    
            Scene scene = SceneBuilder.create()
                    .root(
                        eventOverviewView.getView()
                    ).width(900)
                    .height(700)
                    .build();
            scene.getStylesheets().add(Main.class.getResource("/EventManager.css").toExternalForm());
    
            stage.setScene(scene);
            stage.show();
        }
    }
    
    The views that are being used in the main view are also injected in the main view. Also, the mediator that is behind the main view is also injected. This patterns is used for every view.
    public class EventOverviewView implements IEventOverviewView {
    
        @Inject
        public IEventOverviewMediator mediator;
        @Inject
        public EventListView eventListView;
        @Inject
        public EventDetailView eventDetailView;
    
        ...
    }
    
    Then, in the mediator, we inject the view and the commandProvider (this is a class which allows to create command instances on the fly).
    public class EventOverviewMediator implements IEventOverviewMediator {
    
        @Inject
        public IEventOverviewView view;
        @Inject
        public CommandProvider commandProvider;
    
        ...
    }
    
    And in the application logic layer we inject the service/model in the command.
    public class LoadEventsCommand extends Service<List<EventVO>> {
    
        @Inject
        public IEventService eventService;
    
        ...
    }
    

    Conclusion

    In this post I gave a broad overview of the structure and explained how dependency injection fits into this.
    In the following posts I will go into more detail for each layer and give some best practices.
    You can find the full sample application here: https://github.com/SlevinBE/JavaFx-structure-demo